AN02031: Live Streaming Sound Card Example
Introduction
This application note demonstrates how to use lib_audio_dsp to create a live streaming sound card application. The device captures sound from both a USB source and a microphone, outputting through USB and analog outputs. The sound is processed through a series of Digital Signal Processing (DSP) stages, which can be tuned on the host machine. The application includes an autogenerated Graphical User Interface (GUI) that allows parameters to be adjusted in real-time. It also describes how to modify the DSP pipeline and GUI for custom applications.
Note
Some software components in this tool flow are prototypes and will be updated in Version 2 of the library. The underlying Digital Signal Processing (DSP) blocks are however fully functional. Future updates will enhance the features and flexibility of the design tool.
The sound card features the following DSP stages:
reverb
denoising
ducking
and EQ.
It could be used for applications such as:
Live streaming to social media
Podcasting
Gaming
General purpose headset
The application has the following inputs and outputs:
Stereo analogue input microphone
Stereo input over USB
Stereo analogue output for headphones/speakers
Stereo output over USB for livestreaming/recording.
The DSP pipeline is shown below:
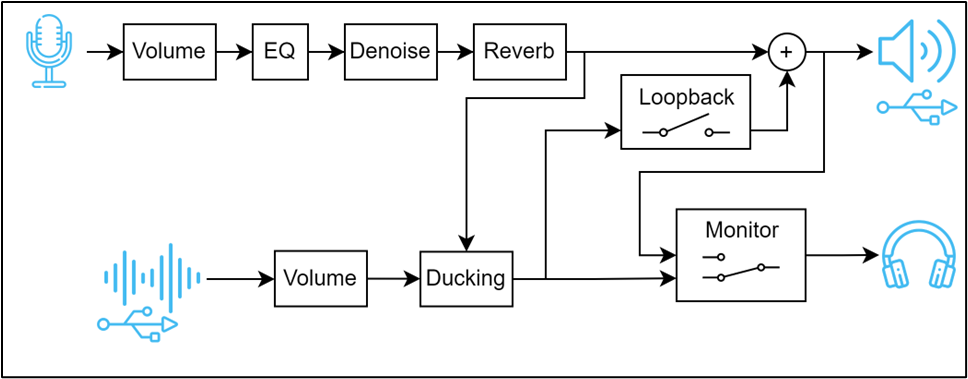
Fig. 1 DSP Pipeline
The audio performance of the demo is:
48 kHz sampling rate
6 sample latency (0.125 ms), excluding ADC & DAC filter (56 samples/ 1.15 ms latency including filters)
Setup
This section guides the user through installing all the necessary components for setting up the application, from both a software and hardware point of view.
Prerequisites
The following are required before setting up the application:
Python 3.12 (recommended) or above.
XMOS Multichannel Audio Evaluation Kit (XMOS XK-AUDIO-316-MC-AB).
Hardware Setup
Connect the XMOS MCAB to the host computer using the USB DEVICE port.
For flashing the board, also connect the DEBUG port. The DEBUG
port can be disconnected once the device has been flashed.
Connect a microphone to the IN 1/2 jack, and headphones to the OUT 1/2 jack.
Note
The microphone input is a stereo TRS jack. This means a balanced mic should not be used, as the stereo inputs are summed, and for a balanced signal this results in total signal cancellation.
Note
A low-impedance microphone or one with a powered preamplifier is recommended to ensure a strong signal for processing. Otherwise, the signal may be too weak for proper handling. Alternatively, users can manually add a fixed gain stage near the beginning of the pipeline.
See the Fig. 2 for an example hardware setup.
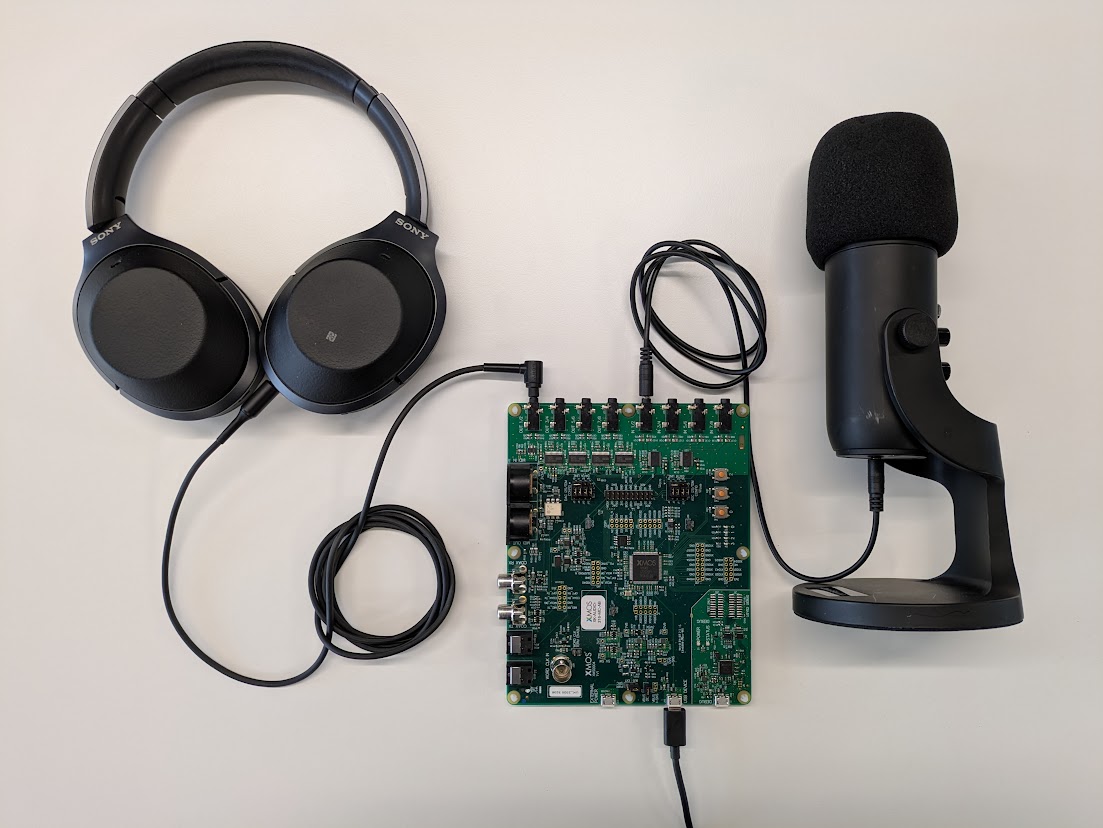
Fig. 2 USB Multichannel Audio Evaluation Kit Setup
Software Setup
A compiled binary is provided, and the device can be flashed from a XMOS XTC command prompt using:
xflash app_an02031\bin\app_an02031.xe
To build from source, refer to the section Saving, Loading and Code Generation.
Installing the libusb Driver on Windows
The first time the device is used on Windows, the libusb driver must be installed. This is done using the third-party tool Zadig.
These steps are only required once and they must be executed while the firmware is running on the device.
Open Zadig and select XMOS Control (Interface 3) from the list of devices. If the device is not present, ensure Options -> List All Devices is checked.
Select libusb-win32 from the list of drivers in the right hand spin box as shown in Fig. 3.
Click the Install Driver button and wait for the installation to complete.
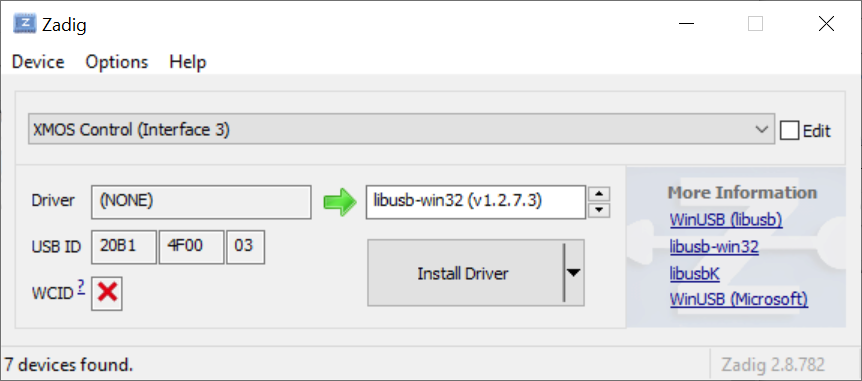
Fig. 3 Selecting the libusb-win32 driver in Zadig for the Control Interface
Adding udev Rules on Linux
For the host application to have access to the XMOS device on Linux, a udev rule must be added. An example rules file is provided in the host directory of the application note, and can be copied to the appropriate location on the host machine as follows
# Copy the udev rules file to the appropriate location
sudo cp host/99-xmos-dsp.rules /etc/udev/rules.d/

# Reload the udev rules and trigger them
sudo udevadm control --reload-rules
sudo udevadm trigger
Running the GUI
Initial Use
In Windows Explorer, double click on tuning.cmd. This will initialise the Python virtual
environment and install requirements. If prompted by Windows Defender, choose “More info” > “Run anyway”.
Once this is done it will open the GUI.
Note
Customers in China may wish to use tuning_cn.cmd instead. This will use https://pypi.tuna.tsinghua.edu.cn/simple
for retrieving Python packages instead of https://pypi.python.org/simple, which may give
increased download speeds.
In a terminal, execute tuning.sh. This will initialise the Python virtual
environment and install requirements. Once this is done it will open the GUI.
On MacOS, if a security warning appears, in Finder open host/bin/dsp_host_macos.
This should open a terminal and print [Process completed]. Then retry running
tuning.sh in a terminal.
Note
Customers in China may wish to use tuning_cn.sh instead. This will use https://pypi.tuna.tsinghua.edu.cn/simple
for retrieving Python packages instead of https://pypi.python.org/simple, which may give
increased download speeds.
The GUI has 4 tabs described below.
End Customer Interface
These are the controls exposed to the final customer. This tab is customised to the application to only expose the controls that are required by the end user. control logic could alternatively be implemented via GPIO. When changing the DSP pipeline, the widgets on this tab may disappear if the parameters they control are not present in the new pipeline.
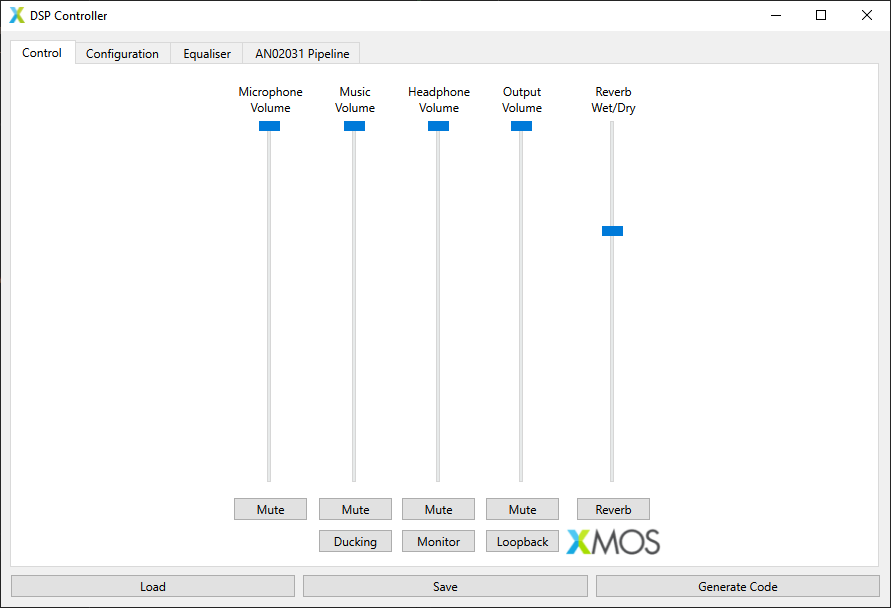
Fig. 4 GUI Control Tab
The controls perform the following functions:
Volume sliders: control the volume of the input/output with optional mute.
Reverb slider: control wet/dry mix of the reverb.
Reverb button: enable/disable the reverb.
Denoise button: enable noise suppression on the microphone.
Ducking button: reduce the volume of the music when there is signal on the microphone.
Monitor button: when on, send the same output to the USB and headphone outputs. When off, do not send the microphone output to the headphones.
Loopback button: when on, send the USB input back to the USB output. Otherwise just send the microphone signal over USB.
Algorithm Tuning Parameters
This tab exposes the lower level tuning parameters to a DSP product engineer for tuning before final production. This tab exposes all the available control parameters in the DSP pipeline, and is autogenerated from the JSON file. When changing the DSP pipeline, this tab will be automatically updated to reflect the new parameters.
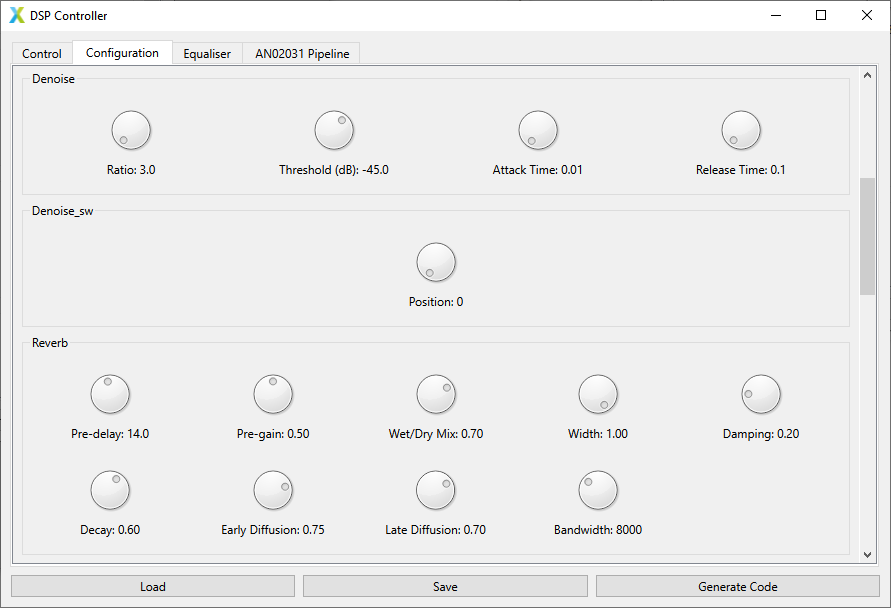
Fig. 5 GUI Configuration Tab
Parametric EQ
This tab shows the EQ being applied to the microphone signal. The type and parameters of each biquad can be set, and the frequency response of the cascade is calculated from it. This tab is autogenerated from the JSON file, and will be updated when the DSP pipeline is changed.
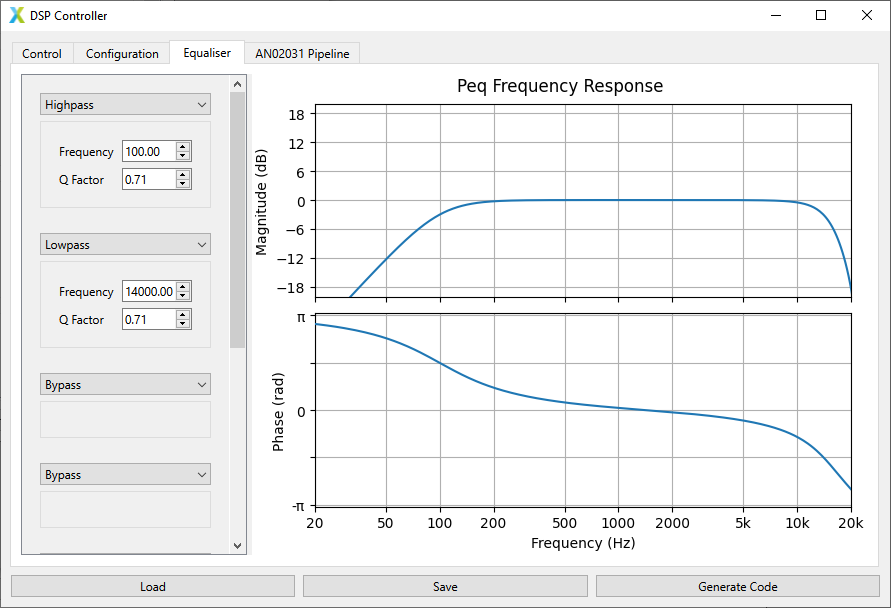
Fig. 6 GUI Equaliser Tab
Pipeline Graphic
This tab contains an image of the DSP pipeline.
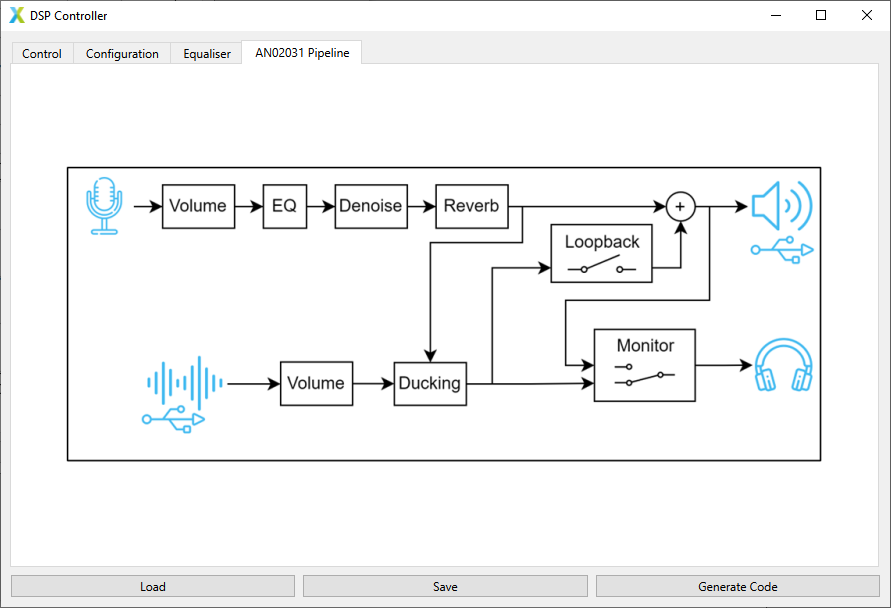
Fig. 7 GUI Pipeline Tab
Saving, Loading and Code Generation
Once the parameters have been tuned to the desired values, they can be saved as a JSON file by clicking the “Save” button. Other sets of parameters can be loaded from the JSON file by using the “Load” button.
During loading, the checksum of the DSP pipeline defined in the JSON
file is compared against the checksum generated from the current DSP
pipeline defined in pipeline.py. If the checksums match, the current DSP
pipeline is updated with the new parameters.
If the checksums do not match, a warning is given to indicate that the
pipelines differ. The loaded JSON file may still be compatible with
the GUI if the exposed tuning parameters defined in tuning_gui.py
have remained the same, and the DSP stages they interact with still
exist. If the loaded JSON file is not compatible with the
current version of the GUI an error is given, and a different version of
the GUI needs to be used. Either way, the user must still reflash the
device with the regenerated DSP pipeline code.
Once the parameters are fully configured, the autogenerated C should be
updated by clicking the “Generate Code” button in the GUI. By default
this selects the folder app_an02031\src\generated_dsp.
The application can then be rebuild by following the steps in
Building the App and Host App from Source.
Alternatively the code can be generated from the command line, see the steps in Updating the DSP Pipeline. This may be useful for regenerating the code as part of a CMake step.
Running the GUI Manually
Instead of using the provided scripts, the GUI can be run manually. To create the Python virtual environment, navigate to the app note directory and run the following commands in a terminal or command prompt.
python -m venv .tuning_venv
.tuning_venv\Scripts\activate
          pip install -Ur requirements.txt
python -m venv .tuning_venv
source .tuning_venv\bin\activate
          pip install -Ur requirements.txt
On secondary runs, the virtual environment can be reactivated with the command:
.tuning_venv\Scripts\activate
source .tuning_venv/bin/activate
To run the GUI, ensure the virtual environment is active and then execute:
python tuning_gui.py
Building the App and Host App from Source
The app is supplied with a full sandbox and compiled app and host apps. Modifications to the DSP pipeline or parameters will require rebuilding, which can be done as described below.
Application
In an XTC Tools 15.3 prompt, navigate to the app note directory, then create and activate a Python virtual environment as described in Running the GUI Manually. Then run Xcommon Cmake to initialise the sandbox:
cd an02031
cmake -G "Unix Makefiles" -B build
To build the app, run:
cmake --build build
Finally, to run it:
xrun app_an02031\bin\app_an02031.xe

# Or, to permanently flash it
xflash app_an02031\bin\app_an02031.xe
Host application
With the application built and with the Python virtual environment and XTC Tools environment active, navigate to the host application directory and configure CMake:
cd host
cmake -B build
To build the host app, run:
cmake --build build
This will generate the host application in the bin directory, where it is then referenced by the tuning GUI. On Windows, this will also ensure that libusb-1.0.dll is copied to the bin directory as a requirement for the app.
Updating the GUI or Modifying the DSP
This application note provides a fixed DSP pipeline and a GUI designed to interact with it. Users may wish to modify or extend the provided DSP pipeline and correspondingly update the GUI. The following sections detail the procedures for accomplishing these tasks. For decoupling the Python GUI from the DSP pipeline, a JSON file is used to describe the complete pipeline and parameters.
Updating the DSP Pipeline
Should it be necessary, the first step involves updating the
DSP pipeline. The pipeline
is defined in the file live_streaming_sound_card_pipeline.py and
utilizes the lib_audio_dsp Python library to generate a pipeline.
The library includes its own documentation in the
Using the Tool
section, which can be consulted to implement any required modifications.
Once the pipeline is updated, the JSON file can be regenerated by calling:
python live_streaming_sound_card_pipeline.py
After updating the pipeline, the C sources need to be regenerated.
Either use the automatically created .tuning_venv, or create a
Python virtual environment as described in Running the GUI Manually. Then,
execute the following command to generate the code for the default
JSON file:
python tuning_gui.py --code-gen
To use a different JSON file, the path to the file can be passed in:
python tuning_gui.py --code-gen path/to/tuning.json
This command will update the generated DSP sources saved in app_an02031/src/generated_dsp. Subsequently, use CMake to compile
the new application using the steps described in Building the App and Host App from Source. The device will need to be reflashed
with the updated DSP pipeline code.
Updating the GUI
This section addresses the addition or removal of widgets in the GUI. The GUI is a straightforward Python application utilizing PySide, a Python binding for the Qt framework. The GUI is defined in “tuning_gui.py”. This defines the bespoke application code for the GUI.
Main Window
The core GUI functionality is implemented in the DspWindow class in
python/tuning_utility/core.py. This combines the PySide GUI functionality
with the DSP pipeline state management and hardware control. It is recommended
to inherit from this class when creating custom GUIs for DSP pipelines:
from tuning_utility.core import DspWindow

 class An02031Window(DspWindow):

    def __init__(self, params: DspJson, code_gen_dir: Path):
       super().__init__(params, code_gen_dir, title="DSP Controller")

       # Create the tabs and widgets here
Layouts
A Layout is required to arrange the widgets in the GUI. Some common layouts are shown below. Additional examples can be found in the PySide documentation
from PySide6.QtWidgets import QVBoxLayout, QHBoxLayout, QGridLayout

# Vertical layout
v_layout = QVBoxLayout()
v_layout.addWidget(widget1)
v_layout.addWidget(widget2)

# Horizontal layout
h_layout = QHBoxLayout()
h_layout.addWidget(widget1)
h_layout.addWidget(widget2)

# Grid layout
grid_layout = QGridLayout()
grid_layout.addWidget(widget1, 0, 0)  # Row 0, Column 0
grid_layout.addWidget(widget2, 0, 1)  # Row 0, Column 1

# Finally, set the layout on a widget or window
main_widget = QWidget()
main_widget.setLayout(v_layout)  # or h_layout, grid_layout, etc.
Widgets
The DSP GUI widgets are defined in the tuning_utility.widgets module.
These widgets are designed to be used to update the parameters of a DSP
stage, and will update the DSP state and trigger control commands from
the host to the device.
Typically, the widgets are initialised with:
A reference to the
DspStateobject, which is used to manage the global DSP state.The name of a stage in the DSP pipeline. This should match the name of the stage when it was added to the pipeline with
p.stage(StageType, input, name).The name of the parameter to control. The available parameters for each stage are defined in a pydantic model, which is documented in the DSP Stages section of the lib_audio_dsp documentation. This also describes the valid parameter ranges, which are used to set the range of the widget.
A simple GUI application can just add widgets to the main window.
from tuning_utility.core import DspWindow
from tuning_utility.widgets import XSlider, XButton, XComboBox

def __init__(self, params: DspJson, code_gen_dir: Path):
   super().__init__(params, code_gen_dir, title="DSP Controller")

   # Create the main widget and layout
   self.main_widget = QWidget()
   main_layout = QVBoxLayout()

   # Create a slider for controlling the volume
   volume_slider = XSlider(self.state, "music_volume", "gain_db")
   main_layout.addWidget(volume_slider)

   # Create a button to toggle a feature on/off
   mute_button = XButton(self.state, "music_volume", "mute_state")
   main_layout.addWidget(mute_button)

   # set the layout on the main widget
   # and set it as the central widget of the window
   self.main_widget.setLayout(main_layout)
   self.setCentralWidget(self.main_widget)
To change the label of a widget, the title parameter can be passed to the widget.
To change the range of a widget, the widget_range can be set:
XSlider(self.state, "stage_name", "parameter_name", title="custom_name", widget_range=(min, max))
To add all the parameters of a stage to the GUI, the StageParameterGroupbox
widget can be used. This will automatically create a group box with all the
parameters of the stage, constrained to their default ranges.
from tuning_utility.widgets import StageParameterGroupbox

# Create a group box for the stage parameters
stage_groupbox = StageParameterGroupbox(self.state, "stage_name")
main_layout.addWidget(stage_groupbox)
For biquad filters, the BiquadWidget can be used to control the
parameters of the biquad filter. This widget will create a dropdown to
select the type of filter, and allow control of the relevant parameters
for each biquad type.
from tuning_utility.widgets import BiquadWidget

# Create a biquad widget for the stage
biquad_widget = BiquadWidget(self.state, "biquad_stage_name")
main_layout.addWidget(biquad_widget)
Tabs
A more complex GUI application could use tabs to organise the widgets into
different tabs. The AN02031Window class does this, and is documented
in the Appendix: GUI APIs section at the end of this document. Using tabs
can be helpful, as it allow Parametric and Graphic EQs to be given more
space for plotting the frequency response. An example of this can be seen
in the make_tabs() method of the AN02031Window class. For more
information on tabs, refer to the PySide documentation on
QTabWidget.
Advanced Usage
Many of the widgets inherit from PySide classes, for documentation on these please refer to the PySide documentation (https://doc.qt.io/qtforpython-6/index.html).
When creating custom widgets, it is recommended to inherit from the
tuning_utility.widgets.XWidget or
tuning_utility.widgets.XFiniteWidget classes, which provide a
consistent interface for updating the DSP state and connecting to the
hardware.
If using a different GUI framework, the
tuning_utility.core.DspState class can be used as a reference for
managing the DSP state and hardware control.
For a list of GUI APIs, see the Appendix: GUI APIs section at the end of this document.
Translations
The tuning_utility package includes support for translations of the GUI. These are
implemented via Qt’s translation system, allowing the GUI to be translated to various languages.
The snippet below shows how to register the provided translations with the application.
from tuning_utility.translations import register_translations
app = QApplication(sys.argv)

register_translations(app)

window = An02031Window(json_obj, code_gen_dir)
Translating GUI strings
The GUI strings for the tuning utility are managed using the Qt
translation system. The translations are stored in .ts files, which
are XML files containing the strings used in the GUI and their
translations.
To ensure a string is in the translation system, it must be wrapped in the
QCoreApplication.translate() function. For ease of use when using
parameter names from lib_audio_dsp, the function tuning_utility.translations.tr_str
is provided. This wraps the QCoreApplication.translate() function in a Python
dictionary, allowing strings from lib_audio_dsp to be translated.
from tuning_utility.translations import tr_str

# Example usage
label_text = tr_str("Parameter Name")

# Alternatively, you can use the QCoreApplication.translate() directly
from PySide6.QtCore import QCoreApplication
label_text = QCoreApplication.translate("Context", "Parameter Name")
If the translation does not exist in the dictionary, the original string will be returned, and a warning will be logged to the console.
Note that on WSL, Chinese fonts are not installed by default, so they may need to be installed by calling:
sudo apt-get update
sudo apt-get install fonts-noto-cjk
Adding/updating new locales
To generate a new locale or update an existing one, you can use the translations.py script.
This script will extract the strings from the GUI and generate a new locale file or update an existing one.
The locale files are stored in the locale directory, and the script will update a .ts file.
To update all the locales if the GUI has been modified, run the following command:
python translations.py -generate
This will update all the .ts files in the locale folder. To create a new locale, copy the en.ts
file and rename it to the desired locale code (e.g., fr.ts for French). Then, you can translate
the strings in that file.
The .ts files are XML files that contain the strings used in the GUI. For ease of translation, these
can be converted to .csv files using the ts2csv.py script. This will create a CSV file with the
strings and their translations, which can be edited in a spreadsheet application.
Note the file encoding is UTF-8.
After editing, you can convert the CSV file back to a .ts file using the csv2ts.py script. This
will generate a new .ts file with the updated translations. Ensure the language tag
<TS version="2.1" language="fr"> line in the .ts file is updated to reflect the correct language code.
Once the translations are in the .ts files, they can be be compiled using the command:
python translations.py -compile
This will compile the .ts files into .qm binary files, which are used by the application for translations.
Appendix: GUI APIs
- class tuning_utility.core.DspWindow(
- params: DspJson,
- code_gen_dir: Path,
- title='XMOS DSP Controller',
Bases:
QMainWindowMain window for the DSP controller application.
This sets up the DSP state machine, and initializes a separate thread for the device control through the host application. It also provides buttons for loading and saving DSP parameters, generating code.
- Parameters:
params (DspJson) – The DSP parameters loaded from a JSON file.
code_gen_dir (Path) – The directory where the generated DSP code will be saved.
title (str, optional) – The title of the main window, by default “DSP Controller”
- class tuning_utility.widgets.StageParameterGroupbox(state, stage_name, label=None)
Bases:
QGroupBoxA group box containing all the runtime controllable parameters for a DSP stage.
BiquadWidget,XComboBox, andXDialwidgets are used for the controls- Parameters:
state (object) – The application state object, which must provide STATE_CHANGED signal and state access.
stage_name (str) – The name of the stage in the state graph to which this widget is bound.
label (str, optional) – The label to display below the groupbox. Defaults to stage_name.
- class tuning_utility.widgets.XSlider(
- state,
- stage_name,
- stage_parameter,
- label=None,
- widget_range=None,
- scale=None,
Bases:
XFiniteWidget,QWidgetA vertical slider widget for adjusting a finite-range parameter. Synchronizes the slider’s value with a parameter in the application state.
- Parameters:
state (object) – The application state object, which must provide STATE_CHANGED signal and state access.
stage_name (str) – The name of the stage in the state graph to which this widget is bound.
stage_parameter (str) – The name of the parameter in the stage to control.
label (str, optional) – The label to display above the slider. Defaults to the stage name.
widget_range (tuple or list, optional) – The minimum and maximum values for the slider. If not provided, inferred from the parameter’s field constraints.
scale (float, optional) – The scaling factor between the widget value and the parameter value. If not provided, inferred from the parameter’s type and range.
- class tuning_utility.widgets.XButton(state, stage_name, stage_parameter, label=None)
Bases:
XWidget,QPushButtonA toggle button widget for boolean or integer parameters. Reflects the parameter’s value as checked/unchecked and updates the parameter in the state when clicked.
This inherits from the QPushButton class. See the QPushButton documentation for more details.
- Parameters:
state (object) – The application state object, which must provide STATE_CHANGED signal and state access.
stage_name (str) – The name of the stage in the state graph to which this widget is bound.
stage_parameter (str) – The name of the parameter in the stage to control.
label (str, optional) – The text to display on the button. Defaults to the capitalized parameter name.
- class tuning_utility.widgets.XComboBox(state, stage_name, stage_parameter, label=None)
Bases:
XWidget,QComboBoxA dropdown box widget for selecting a finite set of options.
This inherits from the QComboBox class. See the QComboBox documentation for more details.
- Parameters:
state (object) – The application state object, which must provide STATE_CHANGED signal and state access.
stage_name (str) – The name of the stage in the state graph to which this widget is bound.
stage_parameter (str) – The name of the parameter in the stage to control.
label (str, optional) – The text to display on the button. Defaults to the capitalized parameter name.
- class tuning_utility.widgets.XDial(
- state,
- stage_name,
- stage_parameter,
- label=None,
- widget_range=None,
- scale=None,
Bases:
XFiniteWidget,QWidgetA rotary dial widget for adjusting a finite-range parameter. Synchronizes the dial’s value with a parameter in the application state and displays the current value as a label.
- Parameters:
state (object) – The application state object, which must provide STATE_CHANGED signal and state access.
stage_name (str) – The name of the stage in the state graph to which this widget is bound.
stage_parameter (str) – The name of the parameter in the stage to control.
label (str, optional) – The label to display below the dial. Defaults to None.
widget_range (tuple or list, optional) – The minimum and maximum values for the dial. If not provided, inferred from the parameter’s field constraints.
scale (float, optional) – The scaling factor between the widget value and the parameter value. If not provided, inferred from the parameter’s type and range.
- class tuning_utility.widgets.BiquadWidget(state, stage_name)
Bases:
XWidget,QWidgetA widget for a biquad filter stage. This widget contains a combobox for selecting the filter type, and a set of scrollboxes for the parameters. When the filter type is changed, the parameters are updated to match the selected filter type.
- Parameters:
state (object) – The application state object, which must provide STATE_CHANGED signal and state access.
stage_name (str) – The name of the stage in the state graph to which this widget is bound.
- class tuning_utility.widgets.PeqTab(state, stage_name)
Bases:
XWidget,QWidgetA widget for the PEQ stage. This widget contains a combobox for selecting the filter type, and a set of scrollboxes for the parameters, and a plot of the frequency response.
- Parameters:
state (object) – The application state object, which must provide STATE_CHANGED signal and state access.
stage_name (str) – The name of the stage in the state graph to which this widget is bound.
- class tuning_utility.widgets.Geq10bTab(state, stage_name)
Bases:
XWidget,QWidgetA widget for the GEQ stage. This widget contains sliders for the gains in each frequency band, and a plot of the frequency response.
- Parameters:
state (object) – The application state object, which must provide STATE_CHANGED signal and state access.
stage_name (str) – The name of the stage in the state graph to which this widget is bound.