Design and manufacture systems with flash memory
The tools can be used to target xCORE devices that use Quad SPI or SPI flash memory for booting and persistent storage.
By default XFLASH fully supports a range of Quad SPI
and SPI devices implemented
in libquadflash and libflash respectively.
If the number of pages, page size and sector size are specified in the
XN file - or the flash device supports
SFDP - XFLASH can easily support significantly
many more devices available on the market.
For some devices, particularly SPI flash devices, additional manual
configuration in reference to the device’s datasheet as described in
the Add support for a new flash device section may be required for XFLASH to
fully support the flash device.
This configuration file can be specified to XFLASH using the --spi-spec
option.
The same configuration file provided to XFLASH can also be used to develop
target software which accesses persistent storage on the flash device
using the libquadflash and libflash libraries.
The xCORE flash format is shown in Flash format diagram.
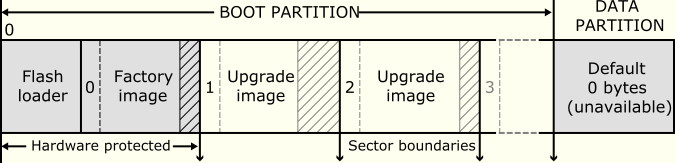
Fig. 20 Flash format diagram
The flash memory is logically split between a boot and data partition. The boot partition consists of a flash loader followed by a “factory image” and zero or more optional “upgrade images.” Each image starts with a descriptor that contains a unique version number, a header that contains a table of code/data segments for each tile used by the program and a CRC. By default, the flash loader boots the image with the highest version with a valid CRC.
Boot a program from flash memory
To load a program into an SPI flash memory device on your development board, start the tools and enter the following commands:
XFLASH prints an enumerated list of all JTAG adapters connected to your PC and the devices on each JTAG chain, in the form:
ID Name Adapter ID Devices-- ---- ---------- -------XFLASH generates an image in the xCORE flash format that contains a first stage loader and factory image comprising the binary and data segments from your compiled program. It then writes this image to flash memory using the xCORE device.
Caution
The XN file used to compile your program must define an SPI flash device and specify the four ports of the xCORE device to which it is connected.
Generate a flash image for manufacture
In manufacturing environments, the same program is typically programmed into multiple flash devices.
To generate an image file in the xCORE flash format, which can be subsequently programmed into flash devices, start the tools and enter the following command:
$ xflash a.xe -o image-file
XFLASH generates an image comprising a first stage loader and your program as the factory image, which it writes to the specified file.
Perform an in-field upgrade
The tools and the flash libraries libquadflash and libflash let you manage multiple firmware upgrades over the life cycle of your product. You can use XFLASH to create an upgrade image and, from within your program, use libflash to write this image to the boot partition. Using libflash, updates are robust against partially complete writes, for example due to power failure: if the CRC of the upgrade image fails during boot, the previous image is loaded instead.
Write a program that upgrades itself using Quad SPI devices
The example program below uses the libquadflash library to upgrade itself.
#include <platform.h>
#include <quadflash.h>

#define MAX_PSIZE 256

/* initializers defined in XN file and available via platform.h */

fl_QSPIPorts QSPI = {
  PORT_SQI_CS,
  PORT_SQI_CLK,
  PORT_SQI_SIO,
  XS1_CLKBLK_1
};

int upgrade(chanend c, int usize) {

 /* Obtain an upgrade image and write
  * it to flash memory.
  * Error checking omitted */

 fl_BootImageInfo b;
 unsigned char page[MAX_PSIZE];
 int psize;

 fl_connect(QSPI);

 psize = fl_getPageSize();
 fl_getFactoryImage(b);
 if(fl_getNextBootImage(b) == 0) {
   while(fl_startImageReplace(b, usize));
 } else {
   while(fl_startImageAdd(b, usize, 0));
 }

 for (int i=0; i<usize/psize; i++) {
   for (int j=0; j<psize; j++) {
     c :> page[j];
   }
   fl_writeImagePage(page);
 }

 fl_endWriteImage();

 fl_disconnect();

 return 0;
}

int main() {
 /* main application - calls upgrade
  * to perform an in-field upgrade */
}
The call to fl_connect opens a connection between the xCORE and Quad SPI
flash device, and the call to fl_getPageSize determines the flash device’s
page size. All read and write operations occur at the page level.
The first upgrade image is located by calling fl_getFactoryImage and
then fl_getNextBootImage. Once located, fl_startImageReplace
prepares this image for replacement with a new image with the specified
(maximum) size. If there is no upgrade image already installed to the
device, fl_startImageAdd prepares adding a new upgrade image, which
can be replaced by future upgrades using fl_startImageReplace.
fl_startImageAdd and fl_startImageReplace must be called until
they return 0, signifying that the preparation is complete.
The function fl_writeImagePage writes the next page of data to the
flash device. Calls to this function return after the data is output to
the device but may return before the device has written the data to its
flash memory. This increases the amount of time available to the
processor to fetch the next page of data. The function
fl_endWriteImage waits for the flash device to write the last page of
data to its flash memory. To simplify the writing operation, XFLASH adds
padding to the upgrade image to ensure that its size is a multiple of
the page size.
The call fl_disconnect closes the connection between the xCORE and
flash device.
Note each of the fl...() functions typically returns a code which should
be checked for success, prior to proceeding to the next step in the process of
writing an upgrade image. These checks have been left out of the example
above to aid clarity in following the process.
Build and deploy the upgrader
To build and deploy the first release of your program, start the tools and enter the following commands:
XCC compiles your program and links it against libquadflash. Alternatively add the option -lflash to your Makefile.
XFLASH generates an image in the xCORE flash format that contains a first stage loader and the first release of your program as the factory image.
To build and deploy an upgraded version of your program, enter the following commands:
XCC compiles your program and links it against libquadflash.
XFLASH generates an upgrade image with the specified version number, which must be greater than 0. Your program should obtain this image to upgrade itself.
When the device is next reset, the loader boots the upgrade image, otherwise it boots the factory image.
Write a program that upgrades itself using SPI devices
The example above can be easily adjusted to use SPI devices with the libflash library. Note the Quad SPI devices and SPI devices use different xcore ports and pins so libquadflash cannot be used with a SPI device (in serial mode).
Changes required to use a SPI device are:
Include
flash.hinstead ofquadflash.hReplace the
fl_QSPIPortsstructure with an instance offl_SPIPortsthat references the correct ports in the XN file.Link against libflash by supplying
-lflash
The initial lines of the example above are shown below with the changes required:
#include <platform.h>
#include <flash.h>

#define MAX_PSIZE 256

/* initializers defined in XN file and available via platform.h */

fl_SPIPorts SPI = {
  PORT_SPI_MISO,
  PORT_SPI_SS,
  PORT_SPI_CLK,
  PORT_SPI_MOSI,
  XS1_CLKBLK_1
};

int upgrade(chanend c, int usize) {

 /* Obtain an upgrade image and write
  * it to flash memory.
  * Error checking omitted */

 fl_BootImageInfo b;
 unsigned char page[MAX_PSIZE];
 int psize;

 fl_connect(SPI);

...
Build for SPI, linking against libflash:
$ xcc main.xc target.xn -lflash -o first-release.xe
Customize the flash loader
The XTC tools let you customize the mechanism for choosing which image is loaded from flash. The example program below determines which image to load based on the value at the start of the data partition.
The XTC loader first calls the function init, and then iterates over each image
in the boot partition. For each image, it calls checkCandidateImageVersion with
the image version number and, if this function returns non-zero and its CRC
is validated, it calls recordCandidateImage with the image version number and
address. Finally, the loader calls reportSelectedImage to obtain the address of the
selected image.
To produce a custom loader, you are required to define the functions init,
checkCandidateImageVersion, recordCandidateImage and reportSelectedImage.
The loader provides the function readFlashDataPage.
extern void * readFlashDataPage(unsigned addr);
int dpVersion;
void* imgAdr;

void init (void) {
  void* ptr = readFlashDataPage(0);
  dpVersion = *(int*) ptr;
}

int checkCandidateImageVersion(int v) {
  return v == dpVersion;
}

void recordCandidateImage(int v, unsigned adr) {
  imgAdr = adr;
}

unsigned reportSelectedImage(void) {
  return imgAdr;
}
Build the loader and write to flash
To create a flash image that contains a custom flash loader and factory image, start the command-line tools and enter the following commands:
XCC compiles your functions for image selection, producing a binary object.
XFLASH writes a flash image containing the custom loader and factory image to the specified file.
Build with additional images and create a binary flash file
The following command builds a flash image that contains a custom flash loader, a factory image and two additional images:
$ xflash factory.xe --loader loader.o --upgrade 1 usb.xe 0x20000 \
   --upgrade 2 avb.xe -o image.bin
The arguments to --upgrade include the version number, executable file and an
optional size in bytes. XFLASH writes each upgrade image on the next sector
boundary. The size argument is used to add padding to an image, allowing it to be
field-upgraded in the future by a larger image.
Reading the numerical and string identifiers in a flash image
A 32-bit integer identifier may be stored in the flash device as shown by the following xflash invocation example:
$ xflash <options> --idnum 12345
A string identifier may be stored in the flash device as shown by the following xflash invocation example:
$ xflash <options> --idstr "My identifier string"
The following example application code shows how these identifiers may be read:
void get_ids() {
  int success;
  success = fl_connectToDevice(ports, deviceSpecs, 1);
  // Check success

  int identifier = fl_getFlashIdNum();

  unsigned char idStr[MAX_LEN];
  success = fl_getFlashIdStr(idStr, MAX_LEN);
  // Check success

  ...
}